
Since my last pumpkin post, I’ve been busy adding to my ever-growing pumpkin patch!
My fireplace is looking distinctly seasonal with pumpkins pretty much taken over! I’ve even bought some Paintbox Simply Super Chunky to make an even larger one for the hearth! Because you can’t have too many pumpkins, can you?

Pumpkins are seriously taking over!
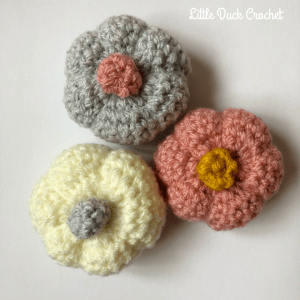
This time, I’m sharing my pattern for my mini pumpkins. They are even quicker to make and only require a small amount of yarn, perfect for some stash-busting!
Materials Needed
- Aran weight yarn – I used Paintbox Yarns Simply Aran
- 3.5mm and 4.5mm hook
- Fibre fill
- Scissors
- Yarn needle
Stitches Used
- Chain Stitch – ch
- Single Crochet – sc
Pattern Notes
- These little pumpkins can be made in a variety of different weight yarns and hooks, and are all easily adaptable to be made bigger if needed!
- The pattern is written in US crochet terms
- You can make the pumpkins bigger by chaining a starting chain of any number and increasing the amount of rows you crochet.
Mini Pumpkins
Row 1: Using a 4.5mm hook and leaving a 30cm tail, ch 25, sl st in first chain made to form a ring being careful not to twist the chain. Ch 1, 1 sc in each ch to end, sl st in top of starting ch (25)
Row 2: Ch 1, 1 sc in each st around, sl st in top of first sc (25)

Row 3 – 11: Rep Row 2, break yarn and fasten off, leaving a 30cm tail (25)
Closing the Pumpkins
These mini pumpkins are closed exactly the same as my larger ones.
Weave the tail from the starting chain through the bottom of each chain until you get back to the beginning. Gently pull to close the circle, making sure not to pull too tight and snap the thread. Sew up the small gap to close your pumpkin.

Repeat this with the tail from the last row, making sure to stuff the pumpkin before you close the pumpkin! Be careful not to stuff the pumpkin to firmly, otherwise it will be harder to shape and the stitches will pull too much.
With the rest of the thread, insert your needle into the top hole and through the bottom of your pumpkin, gently pulling. Re-insert your needle back through the top hole and out through the bottom, so the thread goes from bottom to top and gently pull to shape the pumpkin.
Stalk
Row 1: Using a 3.5mm hook and leaving a long tail, ch 2, 6 sc in 2nd ch from hook (6)
Row 2 – 4: 1 sc in each st, break yarn and fasten off leaving a long tail for joining (6)

Using a yarn needle, close the top of the stalk up. Insert needle through the back loop of the first sc and then repeat this in the next 5 sc. Gently pull to close, inserting the needle in through the top of the stalk and pulling the tail out the bottom.
Attach the stalk through the top of the pumpkin and fasten at the bottom.
Vines
The vines are completely optional and can be made to any length you want! To make them bigger, simply crochet any number length of chain. As you work the [3 hdc] into a number of chains at once, the vine will start to curl.
Row 1: Leaving a long tail, ch 26, [2 hdc] in 3rd ch from hook, working along the chain [3 hdc] in each ch to end, break yarn and fasten off, leaving a long tail

I changed some of my vines up by only working 1 hdc in a couple of the chains to make them less curly and a little more ‘wild’!
Using a yarn needle, attach the vines through the top of the pumpkin and fasten at the bottom if you’ve opted to add them.
To hide any loose threads, using a yarn needle, insert your hook into the bottom of your pumpkin and pull them through to the other side. Being super careful not to cut your stitches, snip the thread as close to the pumpkin as possible and give it a squish. The ends will then be safely hidden inside!
I hope you love making these little pumpkins as much as I do! Don’t forget to share your makes with me over on Instagram!

Happy Crocheting! xx
* This post contains affiliate links.
© Copyright: This pattern and the photographs belong to Little Duck Crochet. Please do not copy, share, change, resell or forward the pattern in any way. I am happy for you to sell your finished item, a link back to my page would be lovely. Thank you.
