

Wall hangings can add an instant pop of colour to any room and make a fantastic addition to your home. The below pattern is easy and quick to make, perfect for a lazy afternoon of relaxing crochet!
To make this wall hanging, you will need the following:
- DK weight yarn in a variety of colours
- 4mm crochet hook
- Yarn needle
- Scissors
- 12″ wooden dowel
- String
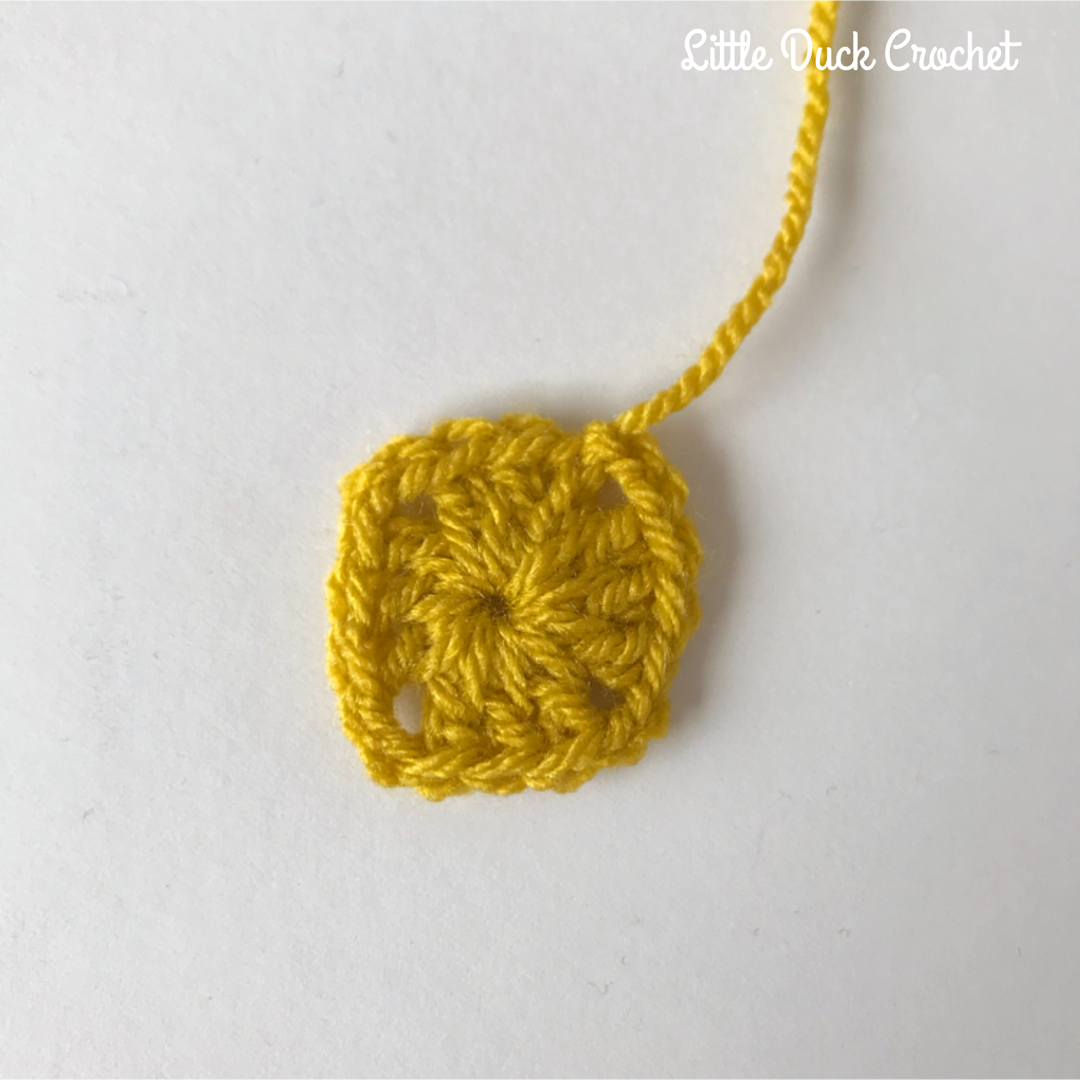
You will need to start off by making a basic granny square.

Round 1:
You need to begin with a slipknot on your hook, then chain 4. Insert your hook into the first chain you made, yarn over and pull the yarn through and slip stitch to create the centre of your granny square.
Ch 3, 2 dc, *3 dc, ch 2; rep from * 3 times, sl st in top of starting ch 3. Break yarn and fasten off.
Round 2:
Now you need to turn your granny square over so that the wrong side is facing you. Join your yarn in any of the ch 2 and ch 3, (2 dc, ch 2, 3 dc) in same ch-sp, *(3 dc, ch 2, 3 dc) in ch-sp; 3 times, sl st in top of starting ch 3, break yarn and fasten off.


Round 3:
Turn you granny square and attach yarn in top right corner, ch 3 (1 dc), (2 dc, ch 2, 3 dc) in same ch-sp, 3 dc, (3 dc, ch 2, 3 dc), 3 dc, *(2 dc, ch 2, 2 dc) in ch-sp; rep from * 3 times, 3 dc, sl st in top of starting ch 3, break yarn and fasten off
")


Round 4
Turn you granny square and attach yarn in top right corner, ch 3 (1 dc), (2 dc, ch 2, 3 dc) in same ch-sp, 3 dc in next 2 ch-sp, (3 dc, ch 2, 3 dc), 3 dc in next 2 ch-sp, *(2 dc, ch 2, 2 dc), 3 dc; rep from * 3 times, 3 dc, sl st in top of starting ch 3


Round 5
Turn you granny square and attach yarn in top right corner, ch 3 (1 dc), (2 dc, ch 2, 3 dc) in same ch-sp, 3 dc in next 3 ch-sp, (3 dc, ch 2, 3 dc), 3 dc in next 3 ch-sp, *(2 dc, ch 2, 2 dc), 3 dc in next 2 ch-sp; rep from * 3 times, 3 dc, sl st in top of starting ch 3
Round 6
Turn you granny square and attach yarn in top right corner, ch 3 (1 dc), (2 dc, ch 2, 3 dc) in same ch-sp, 3 dc in next 4 ch-sp, (3 dc, ch 2, 3 dc), 3 dc in next 4 ch-sp, *(2 dc, ch 2, 2 dc), 3 dc in next 3 ch-sp; rep from * 3 times, 3 dc, sl st in top of starting ch 3
Round 7
Turn you granny square and attach yarn in top right corner, ch 3 (1 dc), (2 dc, ch 2, 3 dc) in same ch-sp, 3 dc in next 5 ch-sp, (3 dc, ch 2, 3 dc), 3 dc in next 5 ch-sp, *(2 dc, ch 2, 2 dc), 3 dc in next 4 ch-sp; rep from * 3 times, 3 dc, sl st in top of starting ch 3
Round 8
Turn you granny square and attach yarn in top right corner, ch 3 (1 dc), (2 dc, ch 2, 3 dc) in same ch-sp, 3 dc in next 6 ch-sp, (3 dc, ch 2, 3 dc), 3 dc in next 6 ch-sp, *(2 dc, ch 2, 2 dc), 3 dc in next 5 ch-sp; rep from * 3 times, 3 dc, sl st in top of starting ch 3
Round 9
Turn you granny square and attach yarn in top right corner, ch 3 (1 dc), (2 dc, ch 2, 3 dc) in same ch-sp, 3 dc in next 7 dc, (3 dc, ch 2, 3 dc), 3 dc in next 29 ch-sp, sl st in top of starting ch 3, break yarn and fasten off.


Border
Turn you granny square and attach yarn in top right corner, ch 1 (does not count as sc), sc in same sp and across to corner, 3 sc in ch-sp, sc down side until you reach the middle dc of the point, 3 sc in middle dc, then sc along side back to starting corner, 2 sc, sl st in top of 1 st made.


Tassels
You will not need to cut 45 lengths of yarn approximately 12″ in length. Using a larks head knot, attach 3 strands together to the middle sc at the point.

")
")
")
Repeat this on the every 3 sc’s until you reach the next corner. Don’t worry that the tassels are wavy, this can easily be corrected!
")


Once you’ve attached all your tassels, very carefully use the steam function of your iron to gently straighten the tassels. Be very careful not to burn yourself when you do this! You can also steam the rest of your granny hanging as it will then hang flat and not curl.
Trim the tassels so that they are all the same length.
Using a yarn needle, cut a long thread of yarn and attach it to the top right corner of your hanging. Attach your hanging to the wooden dowel, looping the yarn over the top of it and missing 2 stitches as you go. Fasten off and break yarn, weave in all the loose ends.
")

")
Attach a length of string to either end of the dowel, and your wall hanging is complete!
It’s also super easy to care for the hanging once it’s displayed. Every so often, give it a gentle shake to loosen any dust particles and make sure that it’s hung away from any little fingers and pets who might be tempted to pull at the tassels!

Hi! Great pattern thank you! Just an amendment, in step one I feel it should be corrected to “Ch 3, 2 dc, ch2 *3 dc, ch 2; rep from * three times, sl st in top of starting ch 3.” to get the 12 distinct double crochets and 4 chain spaces.
LikeLiked by 1 person