I know, I know! It’s only October, I hear some of you cry! We haven’t even had Halloween yet!
But… it’s never to early to get started on those homemade Christmas gifts and decorations!
I absolutely adore handmade Christmas decorations, especially crochet covered baubles. Over the years, I have made so many of them and they are by far one of my most popular items in my Etsy shop. I love how different each one can look by changing up the colours and they are perfect for upcycling old baubles that may have lost their shine.

These little covers are the perfect project to wile away a few hours and are also great for using up any loose ends you may have in your stash! Below, I have shared my pattern for these little bobbly baubles – of course, there had to be bobbles!
With Christmas fast approaching, these will be frequenting my Insatgram even more!

Materials Needed
* Small amounts of cotton yarn – I used Scheepjes Catona
* 3mm hook
* Christmas tree baubles
* Yarn needle
* Scissors
Pattern Notes
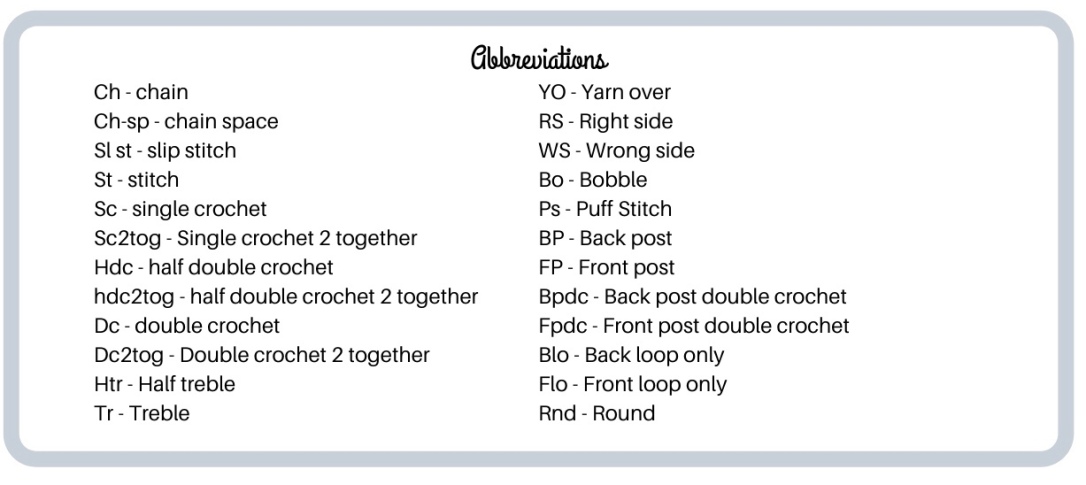
* This pattern is written in US terms.
* If you find the bauble cosy doesn’t quite fit, add an extra round of single crochet.
* These can also be made in a single colour. At the start of each row, slip stitch to the correct stitch to start the round.
Depending on the yarn used, you may need to adjust the hook size accordingly. If you use a DK weight yarn, it may be best to drop down a hook size or two so that the cover fits the bauble snuggly.

Covers – make 2
Round 1: Ch 4, sl st to form a ring. Ch 4 (1 dc, ch1), *1 dc, ch1; rep from * to end, sl st in 3rd ch of starting ch 4, break yarn and fasten off.
Round 2: Join yarn in any ch sp and ch 4 (1 sc, ch 3), *1 sc in ch sp, ch 3; rep from * to end, sl st in 1st ch of starting ch 4, break yarn and fasten off.
Round 3: Join yarn in any ch sp and ch 3 (1 dc), 2 dc in same ch sp, *miss sc, [3 dc] in ch sp; rep from * to end, miss sc, sl st in top of starting ch 3, break yarn and fasten off.
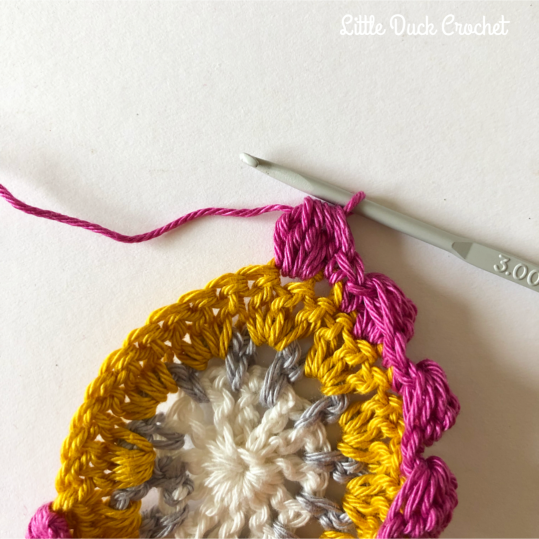
Round 4: Turn your work over with WS facing up. Join yarn in the first dc of any 3 dc cluster and ch 1, 1 bobble, *2 sc, 1 bobble; rep from * to end, sl st in starting ch 1, break yarn and fasten off. Round 5: Turn your work back over with RS facing up.Join yarn in any st and ch 1, sc around to end, sl st leaving a long tail on one side to join.
Weave in all ends apart from one long tail which you will use to join your cover.
With RS facing out, position the edges of your covers together. Carefully position the bauble between the covers (if you would prefer, you can sew part of the cover together and then inset the bauble – just don’t sew too much up or you won’t get it in!). Using a yarn needle, sew the two edges together, going through both loops on each cover.

Sew as close as you can to the top of the bauble and fasten off. Weave in the last ends and your bobbly bauble is complete and ready to be hung on your tree!

I hope you love making these beautiful bobbly baubles as much as I did! I think I’ll need a tree of my own soon just for my crochet baubles!
And don’t forget, if you do make them and you’re over on Instagram, don’t forget to tag me and use the hashtag #ldcbobblybaubles !
Happy crocheting! xxx
© Copyright: This pattern and the photographs belong to Little Duck Crochet. Please do not copy, share, change, resell or forward the pattern in any way. I am happy for you to sell your finished item, a link back to my page would be lovely. Thank you.


