

As soon as the weather starts to turn cooler, all I want to do is snuggle under a cosy blanket with a warming drink and make lots of pumpkins!
And this year has certainly been no different.
Last year, I shared a couple of pumpkin patterns on my blog and I’ve been busy making even more this year! I don’t think my pumpkin patch will ever stop growing!

This pumpkin pattern is a easy pattern and you can make them in any yarn you want! The foundation chain can be made to any length as can the number of rows – so your pumpkins can be all shapes and sizes!
Materials Needed
- Your favourite yarn – I used Stylecraft Special Chunky in Spice
- Crochet hook – I used a 6mm hook
- Soft toy stuffing
- Yarn needle
- Cinnamon stick
Stitches Used
- Sl St – Slip stitch
- Ch – Chain stitch
- Hdc – Half double crochet (UK Half treble)
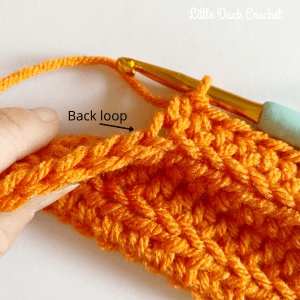
- Hdc Blo – Half double crochet back loop only (UK Half treble back loop only)
Pattern Notes
- The pattern is written in US terms – UK terms can be found translated in the Stitches Used section
- The pumpkins are worked flat and joined with a slip stitch, then sewn together
- Don’t overfill them as you’ll see the stuffing
- You can hold the cinnamon stick to the pumpkin more securely with a dab of hot glue

Pattern
Row 1: Ch 26, 1 hdc in 3rd ch from hook and each ch to end, turn
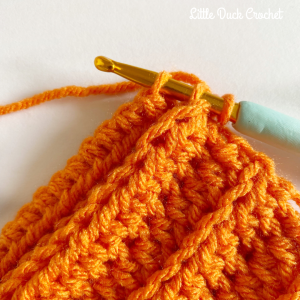
Row 2-20: Ch 1, 1 hdc blo in each st to end, turn
Fold your crochet in half and ch 1, sl st through blo of last row made and foundation chain to end, break yarn and fasten off leaving a long tail for closing the bottom.
Using a yarn needle, weave the tail in and out of the side of the pumpkin until back to start. Gently pull to close and fasten off.
Turn the pumpkin inside out and stuff firmly but don’t over fill it. Cut a long thread of yarn and weave with a yarn needle through the top edge and pull gently to close. Tie the ends and pull one end into the centre of the pumpkin to hide it.

Insert the needle into the centre of the pumpkin and through to the bottom, gently pulling the thread through. Bring the yarn back to the top and insert needle through the top and back to the bottom through the centre of the pumpkin – this will give it shape!
Repeat this another 5 times, positioning the threads around to make 6 segments.
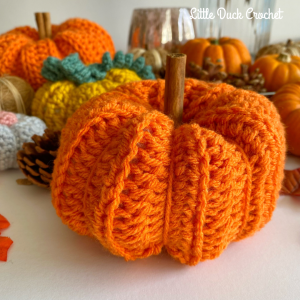
Add a cinnamon stick to the top opening of the pumpkin, securing with a little hot glue if needed.
And that’s it! Your pumpkin is complete!
I hope you enjoy the pattern and don’t forget to tag me in your makes if your on Instagram!
* This post contains affiliate links.
© Copyright: This pattern and the photographs belong to Little Duck Crochet. Please do not copy, share, change, resell or forward the pattern in any way. I am happy for you to sell your finished item, a link back to my page would be lovely. Thank you.
