
The majority of all crochet projects use the basic crochet stitches. They are all easy to learn and once you have mastered them, can be incorporated into any crochet piece.
Throughout this tutorial and future tutorials, I will be writing in US crochet terms.
Chain Stitches
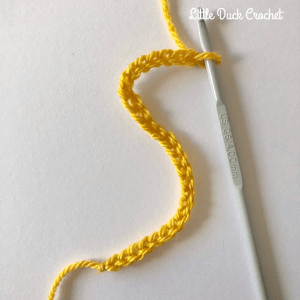
A chain stitch is used to create foundation rows for all crochet pieces and will be the first stitch to learn.
Every pattern varies in the number of chains you much crochet to begin, with the last few chains made being used as turning chains (always read through the pattern notes and pattern before beginning to ensure that this is the case). When a pattern can be adjusted to make it bigger, such as a blanket or scarf, it will tell you how many additional chains you must create for the pattern to work.
For anything over a double crochet, the turning chains will be classed as a stitch and must be worked into, otherwise the sides will not be straight.
For anything under, they are purely turning chains and crocheting into them will create extra stitches.
To create a chain, make a slip knot with your hook, this will be your first chain.


Insert your hook through the loop and wrap the yarn over (YO).


Pull the yarn through and you have now created your second chain. Continue like this until you have chained the amount you require.
Single Crochet (UK Double Crochet)
This is one of the most basic stitches and quite possibly easiest. It’s the foundation to amigurumi and can be found in many different stitches and patterns such as the moss stitch and Suzette stitch, which is a current favourite of mine!
This stitch is a lot more dense than double (UK treble) and half double (UK half treble) crochet and you’ll find that there are less gaps within you crochet. You will find that your work doesn’t build up as quick as a half double crochet or double crochet.
When crocheting a row of single crochet into your foundation chain, you must crochet into the second loop from the hook. The first loop will then count as a turning chain and you will not crochet into that.
Insert hook through loop and YO. Pull through loop so you have 2 loops on your hook.


YO and pull through both loops. Continue like this to the end of your chain.
To create a second row of SC, chain 1 (turning chain), insert hook into first SC, YO, pull through st, YO, pull through both loops on hook.


Repeat this across the row to the end, making sure not to crochet into the turning chain at the end of the first row.
If you do find that the edges of your work because slanted, check that you haven’t worked into any turning chains.
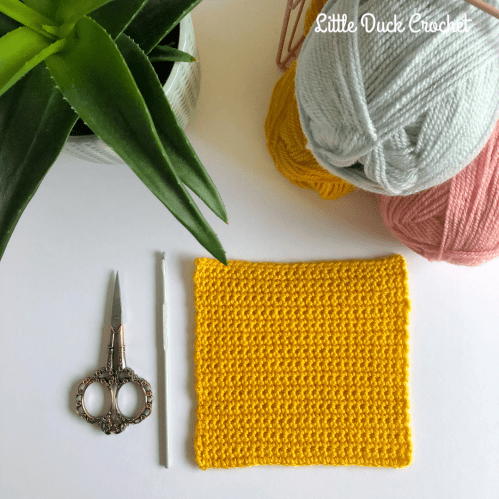
I have put together a little tutorial on how to crochet a swatch of single crochet below. It’s always a good idea to make a swatch whenever you start a new project to not only make sure your tension is correct, but to also understand any new stitches that you’ve not encountered before.
Materials
DK yarn – For this tutorial, I have used Paintbox Simply DK in Mustard
4mm hook
Yarn needle
Scissors
Pattern
Row 1: Ch 25, sc in 2nd ch from loop, sc to end, turn (24)
Row 2: Ch 1, sc across row, turn (24)
Rep Row 2 another 26 times, break yarn and fasten off. Weave in ends.

You may find that your swatch will curl at the ends, don’t panic! This can easily be remedied by a gentle blocking with a steam iron (just be careful not to burn yourself!) or by wetting your swatch and pinning it in place until it’s dry.
*this post contains affiliate links
