

I will openly admit making blankets is one of my guilty pleasures. They instantly brighten the house up and are so warm to snuggle into when the weather starts to cool. With 2 blankets already made and another 3 partially completed just for myself and our 4 little darlings, we didn’t really need another right now!
I didn’t want to use a traditional granny square for this blanket. I had already done that a couple of years ago for Aimee’s blanket. So, I took to Pinterest, searching all the different granny square options I could use before settling for a solid granny square. Seeing other crocheters work with these squares made my mind up.
The hardest part was deciding on the colours that I would use. From the start, I knew that it would be made with Stylecraft Special DK. It’s extremely soft and washes well, but with 71 colours to choose from, it was tough deciding which were the perfect colours.
After much playing around with my yarn pegs, I finally settled on 22 main colours. I needed to see how many squares it would take to cover a double bed. Using a 4mm crochet hook and a turorial I found on the web (there are plenty to choose from!), I made 1 square of each colour to see if the colours definitely worked and how many to make of each!
It was only after this that I realised that the green didn’t really go, it felt too harsh against some of the other colours. So, after looking at the other shades of green available, I eventually settled on meadow.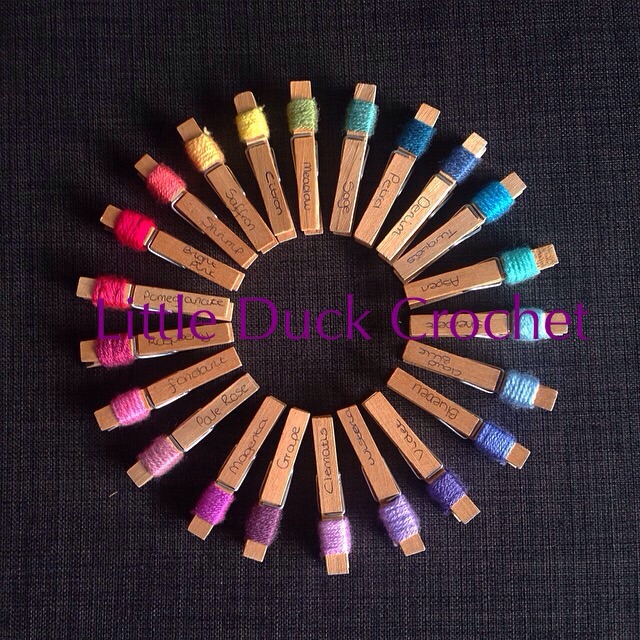 Now that I was happy with the colours, I set about measuring them all on our bed. Realising that I would need over 300 tiny squares and not overly happy with the colours laying side by side, it was eventually decided that a border of cream would make the colours ‘pop’. And that’s exactly what it did!
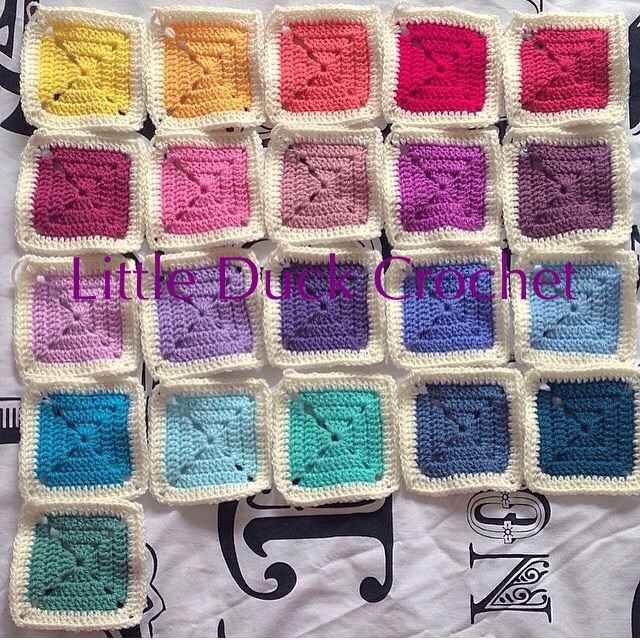 The cream border not only meant the colours stood out better, but also that I only need 196 squares, approximately 9 of each colour. I set myself a target of 3 squares of each colour at a time with the plan of joining them when I hit the 1/3 mark.
Once I reached that stage, the hard part was deciding if I wanted to a pattern or a random effect. The thought of just randomly placing the squares made me feel somewhat nervous, I was completely unsure how they would look!
 I wasn’t overly keen on the way the colours flowed for the patterned layout, so bit the bullet and started joining the squares at random. I left a long tail at the end of each cream round so I could easily stitch them together.
I always feel a sense of achievement when I can see a project coming together and starting to take shape. Once I had stitched the first 66 squares together, I set about making a further 66! I find it so much easier to break up big projects like this blanket into sections, otherwise I tend to overwhelm myself and start something else! This could explain why I have as many WIP’s as I do!
 I love looking at all the little squares and, even though they are randomly placed, I like having a play and making sure that the colours still have some sort of flow to them.
Now it’s starting to grow in size, I can’t wait for the finished blanket to be complete!
xxx

Beautiful work. I love stylecraft special too – so many colours 🙂
LikeLiked by 1 person
Thank you very much for your lovely comment :o) Stylecraft have such lovely colours, it’s so hard to choose from them all!
LikeLike
If i could use them all i would… but not sure my bank account would thank me haha
LikeLiked by 1 person